Lighting is one of the elements that most transforms a common cosplay into a cinematic piece. Beauty masks with glowing eyes, helmets with animated patterns, and illusion props with subtle pulses are capable of causing immediate visual impact. With the growth of trends like beauty masks from characters such as Lucio, Scaramouche, or even stylized versions of Venom, mastering the use of LEDs for cosplay has ceased to be a differentiator to become an essential skill. In this guide, you will learn to plan, assemble, and program mask lighting systems focusing on durability, realism, and dynamic effects — all with accessible techniques for those starting in cosplay electronics.
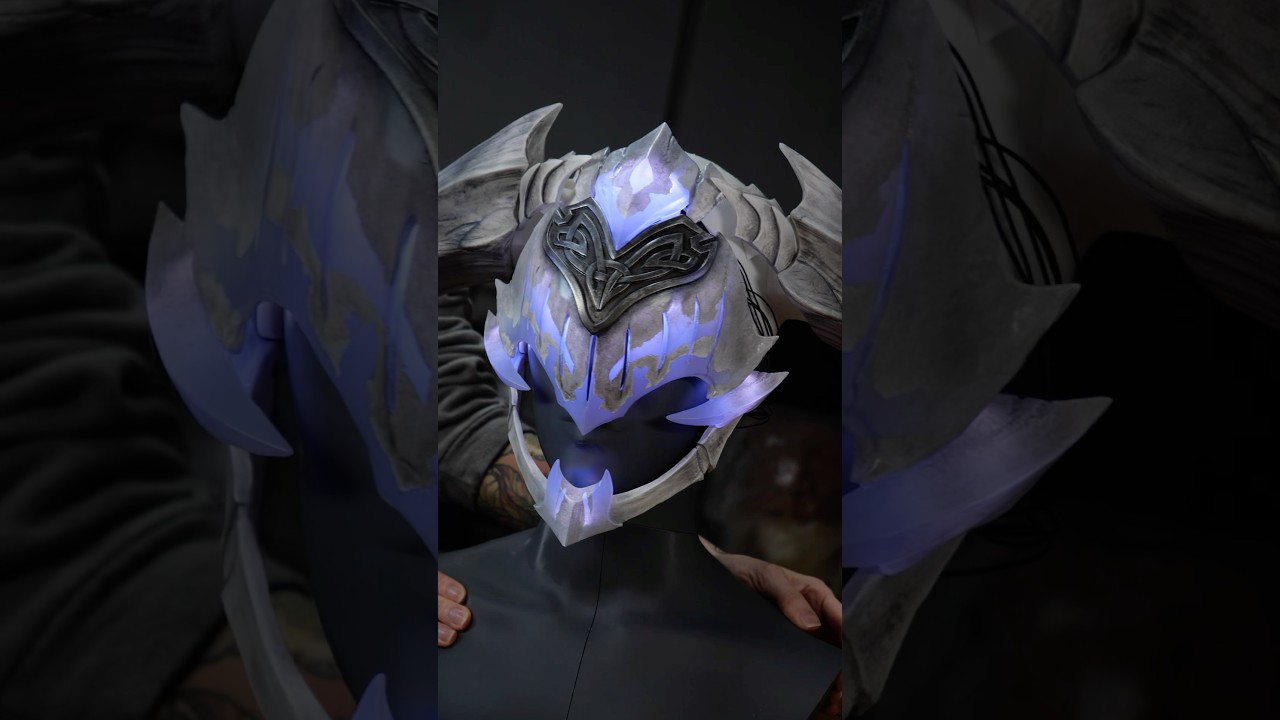
Before diving into soldering or programming, it is fundamental to define the scope of your project. Ask yourself: what is the level of realism I wish to achieve? Will the item be used in indoor or outdoor events? How much time do I have until the convention? These questions define whether you need static lights, sequential animations, or even motion sensors. Complex projects — like the Guardian Arkveld helmet, which combines multiple lighting zones with precise diffusion — demand more time and testing, but can be simplified with planning. The key lies in balancing ambition with the real deadline.
Where to invest (and where to simplify)
Not every project demands Arduino cosplay or complex animations. If your goal is a soft glow in mask eyes, addressable LED strips can be overkill. In this case, use RGB strips with an IR controller — cheaper and easier to install. However, for effects like heartbeat, smooth transitions, or sound synchronization, the use of microcontrollers is indispensable.
LED soldering is a skill worth learning, but can be temporarily replaced by JST connectors or cold shrink, especially if you have difficulty with precision. However, in areas of movement (like mask jaws), soldering is mandatory to avoid disconnections. Another critical point: light diffusion. Materials like food-grade silicone, parchment paper, or even white EVA can be used as diffusers. The secret is testing in thin layers — thick layers dim the light, while very thin layers leave hot spots visible.
For beauty masks, prioritize uniformity. Use strips with silicone coating or apply a layer of liquid silicone over the LEDs. This softens the glow and protects the components. In illusion props, like the 300 LED sword from the Genshin project, density and individual control are essential to create impressive animated patterns:

Technical planning based on real usage
Before choosing any component, define the usage scenario: will it be a static item (like table display) or dynamic (worn in motion during an event)? This directly impacts the choice of batteries, mounting, and heat dissipation. For masks worn at long events, prioritize higher capacity batteries (above 1000mAh) and circuits with low consumption. As for props for short display, like in photos or on stage, LED density and heavy visual effects are viable. Use paper or EVA prototypes to simulate the path of wires and position of controls before final assembly.
Common mistakes and how to avoid them
Even with planning, some mistakes are frequent in mask lighting projects. Knowing them can save time, money, and frustration.
1. Underestimating power consumption
Many cosplayers use small batteries thinking LEDs consume little. A single WS2812B LED can consume up to 60mA at full white. A strip with 30 LEDs can reach 1.8A — which drains 500mAh batteries in less than 20 minutes.
✅ Solution: Calculate total consumption (number of LEDs × expected average color) and choose a battery with capacity 2x larger than necessary. Use a multimeter to test real consumption.
2. Lack of testing before definitive installation
Gluing or pasting LED strips without testing first can be disastrous. A burnt LED or cold solder can require total disassembly.
✅ Solution: Assemble the entire circuit on the bench before installing in the piece. Use battery holders with a switch to facilitate quick testing.
3. Inadequate or absent diffusion
LEDs visible directly create hot spots and look artificial. This is especially critical in beauty masks, where the focus is on the face.
✅ Solution: Use multiple layers of diffusion. Combine a layer of parchment paper with one of silicone or translucent white EVA. Test with the light on in a dark environment.
Also pay attention to heat dissipation. Although SMD LEDs consume little, dense strips in enclosed spaces can generate enough heat to deform plastics or melt adhesives. Always test for at least 30 continuous minutes before use at an event.
Step by step
Now that you have the planning, budget, and know the common mistakes, let's go to practical assembly. This step by step covers the installation of an addressable LED strip in a beauty mask, with programmable animation via Arduino Nano.
-
Plan the LED layout: Based on the mask design, define where the LEDs will be placed (eyes, facial lines, details). Use a pencil to mark the points on the piece. For glowing eye effects, position 3 to 5 LEDs per eye in an arc shape.
Checkpoint: The layout must be symmetrical and aligned with the visual elements of the mask. -
Prepare the LED strip: Cut the WS2812B strip to the desired length, respecting the marked cutting points (usually every 3 LEDs). Solder 28 AWG wires to the VCC, GND, and DIN points. Use heat shrink tubing to insulate.
Checkpoint: After soldering, test the strip with a 5V power source — all LEDs should light up uniformly. -
Connect the microcontroller: Connect the strip's DIN pin to digital pin 6 on the Arduino Nano, VCC to 5V, and GND to GND. Power the Arduino with the LiPo battery via the JST connector.
Checkpoint: The Arduino should be recognized by the computer when connecting the USB cable — check in the IDE. -
Upload the animation code: Open the Arduino IDE and install the FastLED library. Use the example below for a smooth pulse animation:
#include <FastLED.h>
#define LED_PIN     6
#define NUM_LEDS    30
CRGB leds[NUM_LEDS];

void setup() {
  FastLED.addLeds<WS2812B, LED_PIN, GRB>(leds, NUM_LEDS);
}

void loop() {
  for(int i = 0; i < 255; i++) {
    fill_solid(leds, NUM_LEDS, CRGB(i, i, i));
    FastLED.show();
    delay(10);
  }
  for(int i = 255; i > 0; i--) {
    fill_solid(leds, NUM_LEDS, CRGB(i, i, i));
    FastLED.show();
    delay(10);
  }
}
Checkpoint: After uploading, the LEDs should pulse smoothly in white — without freezes or irregular flickering.
-
Install the strip on the mask: Use low-temperature hot glue or 3M double-sided tape to secure the strip. Avoid direct pressure on the LEDs. Cover with a silicone diffuser or a layer of white EVA foam.
Checkpoint: With the light on, the illumination must be uniform, without dark spots or excessive glare. -
Protect and hide the electronics: Place the Arduino and the battery in an accessible compartment, made of EVA foam or thermoformed plastic. Use velcro to secure and allow easy battery replacement. Label the wires.
Checkpoint: The system should run for at least 2 continuous hours without overheating or brightness drop.

Advanced tips for realistic light effects
To take your project even further, consider these techniques used in professional illusion props:
- Sensor control: Use a sound sensor to sync light with music, or a motion sensor to activate LEDs when the arm moves.
- Multiple zones: Split the strip into independent segments (e.g., eyes and facial details) for more complex animations.
- Breathing effects: Simulate gentle breathing by programming slow brightness variations — ideal for organic or demonic characters.
If you are exploring led tutorials focused on realism, it is worth combining lighting with painting techniques. The guide Técnicas de Pintura e Texturização de Máscaras e Elmos shows how to prepare the surface to receive light without unwanted reflections.
Conclusion
Mastering cosplay electronics does not require being an engineer — it requires planning, testing, and patience. With the right materials, a realistic budget, and attention to detail, any cosplayer can create masks of beauty and illusion props with professional-level light effects. The secret is to start simple, test always, and evolve with each project. Now that you know how to install, program, and diffuse light with quality, the next step is to put everything into practice — and surprise the audience with a glow that goes far beyond the visual.
Estimated Budget
| Item | Price range | Source |
| --- | --- | --- |
| Fita de LED (Neopixel/WS2812B) - 1 metro | $3.00 - $7.00 | Estimated FX |
| Microcontrolador (Arduino Nano ou similar) | $5.00 - $9.00 | Estimated FX |
| Bateria Recarregável (LiPo 3.7V - capacidade variada) | $6.00 - $12.00 | Estimated FX |
| Kit de Soldagem Básico (Ferro e Estanho) | $8.00 - $16.00 | Estimated FX |
| Fios, Conectores e Materiais Difusores | $4.00 - $8.00 | Estimated FX |
Estimated conversion based on a reference FX rate; local retail prices may differ.